Laravel Sail Fortify

パクリ37発目!!
AI での確認方法がうまく分からず的確な答えが引き出せずに結局自分でさがしまわる羽目になる、、
パクリ元


![Laravel9 Fortifyで”Route [password.reset] not defined.”のエラーが出た時の対処法](https://tak-bluesky.work/wp-content/uploads/luxe-blogcard/6/6115b056b13da220376c8a13933907aa.jpg)


内容
パクリ元1つ目とかを見てたら出てきた Laravel Fortify が気になったので確認する。
Fortify
パクリ元2つ目から、以下のアカウント関係の便利機能であるというものを理解。
- 登録機能(registration)
- パスワードリセット機能(resetPasswords)
- メール認証機能(emailVerification)
- プロフィール情報の更新機能(updateProfileInformation)
- パスワードの更新機能(updatePasswords)
- 2段階認証機能(twoFactorAuthentication)
パクリ元2つ目は少し古いので、新しめのヤツと言うことでパクリ元3つ目を参考にしよう、あんま変わんないけど。
パクリ元3つ目を参考に Laravel Fortify に対応する。
インストール&ファイル作成
~/example-app$ sail composer require laravel/fortify
・・・
Using version ^1.25 for laravel/fortify
~/example-app$ sail artisan fortify:install
   INFO  Fortify scaffolding installed successfully.
マイグレーション
~/example-app$ sail artisan migrate
・・・
2段階認証機能用のカラムが user テーブルに追加された。
設定変更
パクリ元3つ目は spa ではないので、パクリ元4つ目を見つける。少し古いので spa に対応させつつなんとなく Laravel12 に合わせるようにする。
・・・
   'prefix' => 'api',
・・・
   'views' => false,
・・・
ログイン機能
前回作った LoginController は不要になるはずなので削除して ルートの記載からも削除する。
~/example-app$ rm app/Http/Controllers/Api/LoginController.php
~/example-app$
<?php

use App\Http\Controllers\Api\UsersController;
use Illuminate\Http\Request;
use Illuminate\Support\Facades\Route;

Route::get('/user', function (Request $request) {
    return $request->user();
})->middleware('auth:sanctum');

Route::middleware('auth:sanctum')->group(function () {
    Route::get('/users', [UsersController::class, 'index'])->name('api.users');
});
前回通り http://localhost/login のログインページからログインしたら問題なく遷移。いろいろ試そうと思って再度ログインページからログインしてみたら動かず。ログイン失敗と Console には出ている。ネットワークタブを見ると、ログインで POST 後に / にリダイレクトされている模様。一度ログイン成功したため、認証OKの状態でログインしようとしてダメになっている感じがする。
一旦 Cookie をクリアしてから再度ログインしてみると成功したので確信。現状 /login でspa ページを表示しているのを / にするようにしてリダイレクト先が存在するように修正。
・・・
Route::get('/', [SpaController::class, 'index'])->name('spa');
・・・
        <Route path="/" element={<Login />} />
・・・
http://localhost からログインに関して問題ないことを確認した。
ログアウト機能
ログアウトボタンと押下時処理を追加。
import {
    Box,
    Button,
    Card,
    CardActions,
    CardContent,
    CardHeader,
 } from "@mui/material";
import { useState, useEffect } from 'react';
import { useNavigate } from "react-router-dom";
import axios from 'axios';

type User = {
    id: string;
    name: string;
};
const cardStyle = {
    display: "block",
    transitionDuration: "0.3s",
    height: "450px",
    width: "400px",
    variant: "outlined",
};
const http = axios.create({
    baseURL: 'http://localhost',
    withCredentials: true,
});
export const Dashboard = () => {
    const [users, setUsers] = useState<User[]>([]);
    const navigate = useNavigate();

    const onClickLogout = () => {
        const exec= async () => {
            http.get('/sanctum/csrf-cookie').then((res1) => {
                http.post('/api/logout').then((res2) => {
                    if (res2.status === 204) {
                        console.log("ログアウトに成功しました。");

                        navigate("/");
                    } else {
                        console.log("ログアウトに失敗しました。");
                    }
                }).catch((err) => {
                    console.log("ログアウトに失敗しました。")
                })
            }).catch((err) => {
                console.log("ログアウトに失敗しました。")
            })
        }
        exec();
    };
    const fetchUsers = async () => {
        http.get('/api/users').then((res2) => {
            setUsers(res2.data.data);
        }).catch((err) => {
            console.log("ユーザー取得に失敗しました。")
        })
    }
    useEffect(() =>{
        fetchUsers();
    },[]);

    return (
        <Box
            display="flex"
            alignItems="center"
            justifyContent="center"
            padding={20}
        >
            <Card style={cardStyle}>
                <CardHeader title="User Names" />
                <CardContent>
                {users.map(user => (
                    <div key={user.id}>{user.name}</div>
                ))}
                </CardContent>
                <CardActions>
                    <Button
                        variant="contained"
                        size="large"
                        color="secondary"
                        onClick={onClickLogout}
                    >
                    Logout
                    </Button>
                </CardActions>
            </Card>
        </Box>
    );
};
今回 Laravel 側主体のため react 側のソースは必要最低限だけなのでどうやって確認しようかなと少し思案。先ほど何回かログインできなかったことを利用してみる。
routes/web.php、resources/ts/index.tsx の / 箇所を /login に戻して http://localhost/login からログイン → Dashboard へ遷移 → 再度 http://localhost/login からログイン → Dashboard へ遷移せず、Console エラー確認 までOK。
Cookie 削除後に再度 http://localhost/login からログイン → Dashboard へ遷移 → ログアウトボタン押下 → 再度 http://localhost/login からログイン → Dashboard へ遷移 を確認。
ログアウトに関して問題ないことを確認。/login 箇所を / に忘れずに直しておく。
ユーザー登録機能
ログイン画面に登録画面へのリンクを作成する。パクリ元4つ目だけだとうまくいかなかったのでパクリ元5つ目も参考に対応する。
・・・
                <CardActions>
                    <Button
                        variant="contained"
                        size="large"
                        color="secondary"
                        onClick={() => navigate('/register') }
                    >
                    ユーザー登録
                    </Button>
                </CardActions>
・・・
登録画面へのリンク定義を設定する。
・・・
import { Register } from "./Register";
・・・
        <Route path="/register" element={<Register />} />
・・・
ログイン画面を複製して登録画面作成。
import {
    Box,
    Button,
    Card,
    CardActions,
    CardContent,
    CardHeader,
    TextField,
 } from "@mui/material";
import { useState } from 'react';
import { useNavigate } from "react-router-dom";
import axios from 'axios';

const cardStyle = {
    display: "block",
    transitionDuration: "0.3s",
    height: "450px",
    width: "400px",
    variant: "outlined",
};
const http = axios.create({
    baseURL: 'http://localhost',
    withCredentials: true,
});
export const Register = () => {
    const [email, setEmail] = useState("");
    const [name, setName] = useState("");
    const [password, setPassword] = useState("");
    const [password_confirmation, setPasswordConfirmation] = useState("");
    const navigate = useNavigate();

    const onClickRegister = () => {
        const exec= async () => {
            http.get('/sanctum/csrf-cookie').then((res1) => {
                http.post('/api/register', {email, name, password, password_confirmation}).then((res2) => {
                    if (res2.status === 201) {
                        console.log("登録に成功しました。")
                    }

                    navigate("/dashboard");
                }).catch((err) => {
                    console.log(err.response.data.message)
                })
            }).catch((err) => {
                console.log(err.response.data.message)
            })
        }
        exec();
    };

    return (
        <Box
            display="flex"
            alignItems="center"
            justifyContent="center"
            padding={20}
        >
            <Card style={cardStyle}>
                <CardHeader title="登録ページ" />
                <CardContent>
                    <div>
                        <TextField
                            fullWidth
                            id="email"
                            type="email"
                            label="Email"
                            placeholder="Email"
                            margin="normal"
                            onChange={(e) => setEmail(e.target.value)}
                        />
                        <TextField
                            fullWidth
                            id="username"
                            type="text"
                            label="username"
                            placeholder="username"
                            margin="normal"
                            onChange={(e) => setName(e.target.value)}
                        />
                        <TextField
                            fullWidth
                            id="password"
                            type="password"
                            label="Password"
                            placeholder="Password"
                            margin="normal"
                            onChange={(e) => setPassword(e.target.value)}
                        />
                        <TextField
                            fullWidth
                            id="password_confirmation"
                            type="password"
                            label="PasswordConfirmation"
                            placeholder="PasswordConfirmation"
                            margin="normal"
                            onChange={(e) => setPasswordConfirmation(e.target.value)}
                        />
                    </div>
                </CardContent>
                <CardActions>
                    <Button
                        variant="contained"
                        size="large"
                        color="secondary"
                        onClick={onClickRegister}
                    >
                    Register
                    </Button>
                </CardActions>
            </Card>
        </Box>
    );
};
始め登録成功したので、再度やろうと思ったら登録できてなくてなんでだと追ってたら、登録って認証がない時しか効かないみたいなんだけど、登録成功時にログイン成功時同様に認証OKとなっててダメだった。登録成功時にはいったんログアウトかましてからログイン画面に飛ばす方がいいのかもしれん。なんか設定あるのかな、、あー疲れた。
メール認証機能
やっぱユーザー登録はメールが正しいことを確認しないとね、ということでパクリ元6つ目を参考にメール認証機能も試す。コメントアウトされている設定を修正する。
・・・
    'home' => '/',
・・・
    'features' => [
        Features::registration(),
        Features::resetPasswords(),
        Features::emailVerification(),
・・・
上記 home を変更しているのはメールでのリンク押下後に飛ぶために変更。
・・・
MAIL_MAILER=smtp
MAIL_SCHEME=null
MAIL_HOST=xxx
MAIL_PORT=587
MAIL_USERNAME=xxx
MAIL_PASSWORD=xxx
MAIL_FROM_ADDRESS="xxx"
MAIL_FROM_NAME="${APP_NAME}"
・・・
・・・
use Illuminate\Contracts\Auth\MustVerifyEmail;
・・・
class User extends Authenticatable implements MustVerifyEmail
・・・
登録時に 201 返ってきてそのまま登録してしまうのでどういうことかと思ってたけど、メールでのリンク押下で email_verified_at に値が入って有効なユーザーになるということね、なので登録後に表示する画面を作成する。
・・・
import { SentEmail } from "./SentEmail";
・・・
        <Route path="/sent_email" element={<SentEmail />} />
・・・
・・・
                    if (res2.status === 201) {
                        console.log("登録に成功しました。")
                        navigate("/sent_email");
                        return;
                    }
・・・
import {
    Box,
    Card,
    CardContent,
 } from "@mui/material";

export const SentEmail = () => {
    const cardStyle = {
        display: "block",
        transitionDuration: "0.3s",
        height: "450px",
        width: "400px",
        variant: "outlined",
    };

    return (
        <Box
            display="flex"
            alignItems="center"
            justifyContent="center"
            padding={20}
        >
            <Card style={cardStyle}>
                <CardContent>
                    <div>指定したメールアドレスにメールを送信しました。</div>
                    <div>受信したメールを確認してください。</div>
                </CardContent>
            </Card>
        </Box>
    );
};
メールを日本語化する。
APP_NAME=TESTアプリ
・・・
APP_LOCALE=ja
・・・
{
    "Verify Email Address":"メールアドレスの検証",
    "Please click the button below to verify your email address.":"メールアドレスの検証を行うため下記のボタンをクリックしてください。",
    "If you did not create an account, no further action is required.":"もしアカウントを作成していない場合は追加の処理は必要ありません。",
    "Hello!":"こんにちは",
    "Regards,":"今後ともよろしくお願いします。",
    "If you're having trouble clicking the \":actionText\" button, copy and paste the URL below\ninto your web browser:":"もし \":actionText\" ボタンがクリックできない場合は、下部に表示されているURLを直接ブラウザにコピー&ペーストしてください。"
}
メールから飛んで登録OK時にログイン画面に戻るので流れも問題なくOK.
パスワードリセット機能
これはログイン時にパスワードが分からなくてリセットするパターン。パクリ元7つ目からパクる感じだが、このページは画面があるので分かりやすいのでまず画面を作成。メールを指定する画面とメールから飛んできてパスワードを更新する画面の2つ。
・・・
import { ForgotPassword } from "./ForgotPassword";
import { ResetPassword } from "./ResetPassword";
・・・
        <Route path="/forgot_password" element={<ForgotPassword />} />
        <Route path="/reset-password" element={<ResetPassword />} />

・・・
・・・
                <CardActions>
                    <Button
                        variant="contained"
                        size="large"
                        color="success"
                        onClick={() => navigate('/forgot_password') }
                    >
                    パスワードリセット
                    </Button>
                </CardActions>
・・・
import {
    Box,
    Button,
    Card,
    CardActions,
    CardContent,
    CardHeader,
    TextField,
 } from "@mui/material";
import { useState } from 'react';
import { useNavigate } from "react-router-dom";
import axios from 'axios';

const cardStyle = {
    display: "block",
    transitionDuration: "0.3s",
    height: "450px",
    width: "400px",
    variant: "outlined",
};
const http = axios.create({
    baseURL: 'http://localhost',
    withCredentials: true,
});
export const ForgotPassword = () => {
    const [email, setEmail] = useState("");
    const navigate = useNavigate();

    const onClickForgotPassword = () => {
        const exec = async () => {
            http.get('/sanctum/csrf-cookie').then((res1) => {
                http.post('/api/forgot-password', {email}).then((res2) => {
                    if (res2.status === 200) {
                        console.log("パスワードリセット");
                        navigate("/sent_email");
                        return;
                    } else {
                        console.log("パスワードリセットに失敗しました。");
                    }
                }).catch((err) => {
                    console.log(err.response.data.message)
                })
            }).catch((err) => {
                console.log(err.response.data.message)
            })
        }
        exec();
    };

    return (
        <Box
            display="flex"
            alignItems="center"
            justifyContent="center"
            padding={20}
        >
            <Card style={cardStyle}>
                <CardHeader title="パスワードリセット" />
                <CardContent>
                    <div>
                        <TextField
                            fullWidth
                            id="email"
                            type="email"
                            label="Email"
                            placeholder="Email"
                            margin="normal"
                            onChange={(e) => setEmail(e.target.value)}
                        />
                    </div>
                </CardContent>
                <CardActions>
                    <Button
                        variant="contained"
                        size="large"
                        color="secondary"
                        onClick={onClickForgotPassword }
                    >
                    Reset Password
                    </Button>
                </CardActions>
            </Card>
        </Box>
    );
};
import {
    Box,
    Button,
    Card,
    CardActions,
    CardContent,
    CardHeader,
    TextField,
 } from "@mui/material";
import { useState } from 'react';
import { useNavigate } from "react-router-dom";
import { useLocation } from 'react-router-dom';
import axios from 'axios';

const cardStyle = {
    display: "block",
    transitionDuration: "0.3s",
    height: "450px",
    width: "400px",
    variant: "outlined",
};
const http = axios.create({
    baseURL: 'http://localhost',
    withCredentials: true,
});
export const ResetPassword = () => {
    const [password, setPassword] = useState("");
    const [password_confirmation, setPasswordConfirmation] = useState("");
    const navigate = useNavigate();
    const search = useLocation().search;
    const query = new URLSearchParams(search);
    const email = query.get('email');
    const token = query.get('token');

    const onClickResetPassword  = () => {
        const exec = async () => {
            http.get('/sanctum/csrf-cookie').then((res1) => {
                http.post('/api/reset-password', {password, password_confirmation, email, token}).then((res2) => {
                    if (res2.status === 200) {
                        console.log("パスワードリセットに成功しました。");
                        navigate("/");
                        return;
                    } else {
                        console.log("パスワードリセットに失敗しました。");
                    }
                }).catch((err) => {
                    console.log(err.response.data.message)
                })
            }).catch((err) => {
                console.log(err.response.data.message)
            })
        }
        exec();
    };

    return (
        <Box
            display="flex"
            alignItems="center"
            justifyContent="center"
            padding={20}
        >
            <Card style={cardStyle}>
                <CardHeader title="パスワードリセット" />
                <CardContent>
                    <div>
                        <TextField
                            fullWidth
                            id="email"
                            label="email"
                            variant="filled"
                            defaultValue={query.get('email')??""}
                            slotProps={{ htmlInput: {readOnly: true }}}
                            placeholder="Email"
                            margin="normal"
                        />
                        <TextField
                            fullWidth
                            id="password"
                            type="password"
                            label="Password"
                            placeholder="Password"
                            margin="normal"
                            onChange={(e) => setPassword(e.target.value)}
                        />
                        <TextField
                            fullWidth
                            id="password_confirmation"
                            type="password"
                            label="PasswordConfirmation"
                            placeholder="PasswordConfirmation"
                            margin="normal"
                            onChange={(e) => setPasswordConfirmation(e.target.value)}
                        />
                    </div>
                </CardContent>
                <CardActions>
                    <Button
                        variant="contained"
                        size="large"
                        color="secondary"
                        onClick={onClickResetPassword  }
                    >
                    Reset Password
                    </Button>
                </CardActions>
            </Card>
        </Box>
    );
};
URL がないとエラーが出ていたが、パクリ元8つ目に書いてあった方法で解決。
・・・
    public function boot(): void
    {
・・・
        \Illuminate\Auth\Notifications\ResetPassword::createUrlUsing(function ($user, string $token) {
            return config('app.url') . '/reset-password?email=' . $user->email . '&token=' . $token;
        });
外からくるアクセスを全て受け止めるのでルートを修正。
- Route::get('/', [SpaController::class, 'index'])->name('spa');
+ Route::get('/{any}', [SpaController::class, 'index'])->where('any', '.*');
さらにメールの日本語化も。
{
・・・
    "Reset Password Notification":"パスワードリセットのお知らせ",
    "You are receiving this email because we received a password reset request for your account.":"パスワードリセットの申請を受け付けました。",
    "Reset Password":"パスワードリセット",
    "This password reset link will expire in :count minutes.":"パスワードリセットのURL期限は、\":count\"分です。",
    "If you did not request a password reset, no further action is required.":"パスワードリセットの申請に心当たりがない場合対応は不要です。"
}
確認OK。
プロフィール情報の更新機能
これはログイン後に行う機能なのでダッシュボードにリンクをつけておく。
・・・
import { EditProfile } from "./EditProfile";
・・・
        <Route path="/edit_profile" element={<EditProfile />} />
・・・
・・・
                <CardActions>
                    <Button
                        variant="contained"
                        size="large"
                        color="primary"
                        onClick={() => navigate('/edit_profile') }
                    >
                    プロフィール更新
                    </Button>
                </CardActions>
・・・
import {
    Box,
    Button,
    Card,
    CardActions,
    CardContent,
    CardHeader,
    TextField,
 } from "@mui/material";
import { useState, useEffect } from 'react';
import { useNavigate } from "react-router-dom";
import axios from 'axios';

const cardStyle = {
    display: "block",
    transitionDuration: "0.3s",
    height: "450px",
    width: "400px",
    variant: "outlined",
};
const http = axios.create({
    baseURL: 'http://localhost',
    withCredentials: true,
});
export const EditProfile = () => {
    const [email, setEmail] = useState("");
    const [currentEmail, setCurrentEmail] = useState("");
    const [name, setName] = useState("");
    const navigate = useNavigate();

    const onClickEditProfile = () => {
        const exec = async () => {
            http.get('/sanctum/csrf-cookie').then((res1) => {
                http.put('/api/user/profile-information', {email, name}).then((res2) => {
                    if (res2.status === 200) {
                        console.log("プロフィール情報の更新")
                        if (currentEmail !== email) {
                            navigate("/sent_email")
                        } else {
                            navigate("/dashboard");
                        }
                    }
                }).catch((err) => {
                    console.log(err.response.data.message)
                })
            }).catch((err) => {
                console.log(err.response.data.message)
            })
        }
        exec();
    };
    const fetchUser = async () => {
        http.get('/api/user').then((res2) => {
            setName(res2.data.name);
            setEmail(res2.data.email);
            setCurrentEmail(res2.data.email);
        }).catch((err) => {
            console.log("ユーザー取得に失敗しました。")
        })
    }
    useEffect(() =>{
        fetchUser();
    },[]);

    return (
        <Box
            display="flex"
            alignItems="center"
            justifyContent="center"
            padding={20}
        >
            <Card style={cardStyle}>
                <CardHeader title="プロフィール情報の更新" />
                <CardContent>
                    <div>
                    <TextField
                            fullWidth
                            id="username"
                            type="text"
                            label="username"
                            placeholder="username"
                            margin="normal"
                            value={name}
                            onChange={(e) => setName(e.target.value)}
                        />
                        <TextField
                            fullWidth
                            id="email"
                            type="email"
                            label="Email"
                            placeholder="Email"
                            margin="normal"
                            value={email}
                            onChange={(e) => setEmail(e.target.value)}
                        />
                    </div>
                </CardContent>
                <CardActions>
                    <Button
                        variant="contained"
                        size="large"
                        color="secondary"
                        onClick={onClickEditProfile}
                    >
                    更新
                    </Button>
                </CardActions>
            </Card>
        </Box>
    );
};
ただ変更だけするのは簡単に終わったんだけど、、メール認証機能が有効でメールアドレスを変更する場合、更新ボタン押下後にメールを確認してください画面というかメッセージを出したいんだけど、名前だけを変更してすぐ更新できる場合とレスポンスが同じ 200 なので違いが分からない。。なので初めに自分のアドレスを持ってきておいて、それと異なる場合はメールを確認する旨の画面に遷移するようにした(実運用ならメッセージ表示かな)。けどこれメールアドレス変更してメールからのアクションない場合、そのままログインできなくなってしまうな、、危うい。
パスワードの更新機能
これもログイン後に行う機能なのでダッシュボードにリンクつけておく。
・・・
import { EditPassword } from "./EditPassword";
・・・
        <Route path="/edit_password" element={<EditPassword />} />
・・・
・・・
                <CardActions>
                    <Button
                        variant="contained"
                        size="large"
                        color="secondary"
                        onClick={() => navigate('/edit_password') }
                    >
                    パスワード更新
                    </Button>
                </CardActions>
・・・
import {
    Box,
    Button,
    Card,
    CardActions,
    CardContent,
    CardHeader,
    TextField,
 } from "@mui/material";
import { useState } from 'react';
import { useNavigate } from "react-router-dom";
import axios from 'axios';

const cardStyle = {
    display: "block",
    transitionDuration: "0.3s",
    height: "450px",
    width: "400px",
    variant: "outlined",
};
const http = axios.create({
    baseURL: 'http://localhost',
    withCredentials: true,
});
export const EditPassword = () => {
    const [current_password, setCurrentPassword] = useState("");
    const [password, setPassword] = useState("");
    const [password_confirmation, setPasswordConfirmation] = useState("");
    const navigate = useNavigate();

    const onClickEditPassword = () => {
        const exec = async () => {
            http.get('/sanctum/csrf-cookie').then((res1) => {
                http.put('/api/user/password', {current_password, password, password_confirmation}).then((res2) => {
                    if (res2.status === 200) {
                        console.log("パスワードの更新")
                        navigate("/");
                    }
                }).catch((err) => {
                    console.log(err.response.data.message)
                })
            }).catch((err) => {
                console.log(err.response.data.message)
            })
        }
        exec();
    };

    return (
        <Box
            display="flex"
            alignItems="center"
            justifyContent="center"
            padding={20}
        >
            <Card style={cardStyle}>
                <CardHeader title="パスワードの更新" />
                <CardContent>
                    <div>
                    <TextField
                            fullWidth
                            id="current_password"
                            type="password"
                            label="Current Password"
                            placeholder="Current Password"
                            margin="normal"
                            onChange={(e) => setCurrentPassword(e.target.value)}
                        />
                    <TextField
                            fullWidth
                            id="password"
                            type="password"
                            label="New Password"
                            placeholder="New Password"
                            margin="normal"
                            onChange={(e) => setPassword(e.target.value)}
                        />
                        <TextField
                            fullWidth
                            id="password_confirmation"
                            type="password"
                            label="New Password Confirmation"
                            placeholder="New Password Confirmation"
                            margin="normal"
                            onChange={(e) => setPasswordConfirmation(e.target.value)}
                        />
                    </div>
                </CardContent>
                <CardActions>
                    <Button
                        variant="contained"
                        size="large"
                        color="secondary"
                        onClick={onClickEditPassword}
                    >
                    更新
                    </Button>
                </CardActions>
            </Card>
        </Box>
    );
};
パスワード更新したらログアウトされるようなのでログイン画面に飛ばす。確認OK。
2要素認証機能
パクリ元2つ目には「2段階認証」とあったが「2要素認証」の方がしっくりくるのでそうする。
色々見てもさっぱり分からなかったのでたくさん探してやっと分かりやすいのが見つかった。パクリ元9つ目にて blade による遷移を確認する。
ログイン画面→(ログイン)→ダッシュボード画面→2要素認証有効/無効化(QRコード/リカバリーコード表示)画面→(有効化)→パスワード再入力画面→(パスワード再入力)→2要素認証有効/無効化(QRコード/リカバリーコード表示)画面→(有効化)→2要素認証有効/無効化(QRコード/リカバリーコード表示)画面でQRコード/リカバリーコード表示→(スマホのGoogle AuthenticatorでQRコード読み取り、または、リカバリーコードの保存)→(ログアウト)→ログイン画面→(ログイン)→2要素認証コード入力画面→(スマホのGoogle Authenticatorのコード入力、または、保存したリカバリーコードの入力)→ダッシュボード画面
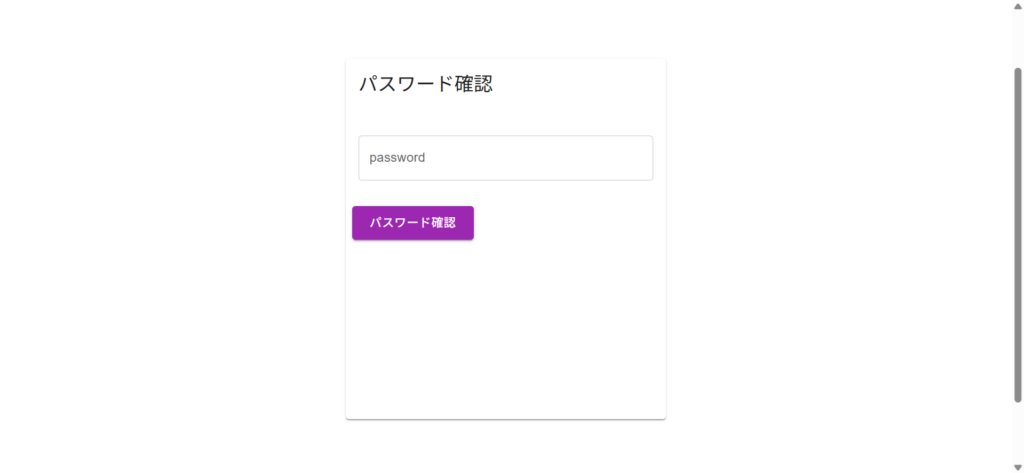
なるほどなるほど、これは分かりにくい。まずは、「2要素認証有効/無効化(QRコード/リカバリーコード表示)画面」が欲しいが、その前にパスワード確認が必要なので一緒に作る。ダッシュボードにリンクをつけてから画面作成。
・・・
                    <Button
                        variant="contained"
                        size="large"
                        color="success"
                        onClick={() => navigate('/confirm_password') }
                    >
                    2要素認証
                    </Button>
・・・
・・・
import { ConfirmPassword } from "./ConfirmPassword";
import { TwoFactorAuthentication } from "./TwoFactorAuthentication";
・・・
        <Route path="/confirm_password" element={<ConfirmPassword />} />
        <Route path="/two-factor-authentication" element={<TwoFactorAuthentication />} />

・・・
import {
    Box,
    Button,
    Card,
    CardActions,
    CardContent,
    CardHeader,
    TextField,
 } from "@mui/material";
import { useState, useEffect } from 'react';
import { useNavigate } from "react-router-dom";
import axios from 'axios';

const cardStyle = {
    display: "block",
    transitionDuration: "0.3s",
    height: "450px",
    width: "400px",
    variant: "outlined",
};
const http = axios.create({
    baseURL: 'http://localhost',
    withCredentials: true,
});
export const ConfirmPassword = () => {
    const [password, setPassword] = useState("");
    const navigate = useNavigate();

    const onClickConfirmPassword = () => {
        const exec = async () => {
            http.get('/sanctum/csrf-cookie').then((res1) => {
                http.post('/api/user/confirm-password', {password}).then((res2) => {
                    if (res2.status === 201) {
                        console.log("パスワード確認")
                        navigate("/two-factor-authentication");
                    } else {
                        console.log("パスワード確認に失敗しました。")
                    }
                }).catch((err) => {
                    console.log(err.response.data.message)
                })
            }).catch((err) => {
                console.log(err.response.data.message)
            })
        }
        exec();
    };
    const fetchQrcode = async () => {
        http.get('/api/user/two-factor-qr-code').then((res2) => {
            if(res2.status !== 423) {
                console.log("パスワード確認済み")
                navigate("/two-factor-authentication");
            }
        }).catch((err) => {
            console.log("QRコード取得に失敗しました。")
        })
    }
    useEffect(() =>{
        fetchQrcode();
    },[]);

    return (
        <Box
            display="flex"
            alignItems="center"
            justifyContent="center"
            padding={20}
        >
            <Card style={cardStyle}>
                <CardHeader title="パスワード確認" />
                <CardContent>
                    <div>
                    <TextField
                            fullWidth
                            id="password"
                            type="password"
                            label="password"
                            placeholder="password"
                            margin="normal"
                            onChange={(e) => setPassword(e.target.value)}
                        />
                    </div>
                </CardContent>
                <CardActions>
                    <Button
                        variant="contained"
                        size="large"
                        color="secondary"
                        onClick={onClickConfirmPassword}
                    >
                    パスワード確認
                    </Button>
                </CardActions>
            </Card>
        </Box>
    );
};
import {
    Box,
    Button,
    Card,
    CardActions,
    CardContent,
    CardHeader,
 } from "@mui/material";
import { useState, useEffect } from 'react';
import { useNavigate } from "react-router-dom";
import axios from 'axios';

const cardStyle = {
    display: "block",
    transitionDuration: "0.3s",
    height: "450px",
    width: "400px",
    variant: "outlined",
};
const http = axios.create({
    baseURL: 'http://localhost',
    withCredentials: true,
});
export const TwoFactorAuthentication = () => {
    const [enabled, setEnabled] = useState(false);
    const [qrcode, setQrcode] = useState("");
    const [recoveryCodes, setRecoveryCodes] = useState([]);
    const navigate = useNavigate();

    const onClickExec = () => {
        const exec = async () => {
            http.get('/sanctum/csrf-cookie').then((res1) => {
                let method;
                if (enabled) {
                    method = http.delete;
                } else {
                    method = http.post;
                }
                method('/api/user/two-factor-authentication').then((res2) => {
                    if (res2.status === 200) {
                        if (enabled) {
                            console.log("無効化成功")
                            setEnabled(false)
                        } else {
                            console.log("有効化成功")
                            setEnabled(true)
                        }
                        showQrcode();
                        showRecoveryCode();
                    } else {
                        if (enabled) {
                            console.log("無効化失敗")
                        } else {
                            console.log("有効化失敗")
                        }
                    }
                }).catch((err) => {
                    console.log(err.response.data.message)
                })
            }).catch((err) => {
                console.log(err.response.data.message)
            })
        }
        exec();
    };
    const showQrcode = async (initial: boolean = false) => {
        http.get('/api/user/two-factor-qr-code').then((res2) => {
            if (res2.data.svg) {
                setQrcode(res2.data.svg);
                if (initial)setEnabled(true);
            }
        }).catch((err) => {
            console.log("QRコード取得に失敗しました。")
        })
    }
    const showRecoveryCode = async () => {
        http.get('/api/user/two-factor-recovery-codes').then((res2) => {
            setRecoveryCodes(res2.data);
        }).catch((err) => {
            console.log("リカバリーコード取得に失敗しました。")
        })
    }
    useEffect(() =>{
        showQrcode(true);
        showRecoveryCode();
    },[]);

    return (
        <Box
            display="flex"
            alignItems="center"
            justifyContent="center"
            padding={20}
        >
            <Card style={cardStyle}>
                <CardHeader title="2要素認証" />
                {enabled &&
                <CardContent>
                    <div dangerouslySetInnerHTML={{__html: qrcode}} />
                    <hr />
                    <b>Recovery code:</b>
                    {recoveryCodes.map(recoveryCode => (
                        <div>{recoveryCode}</div>
                    ))}
                </CardContent>
                }
                <CardActions>
                    <Button
                        variant="contained"
                        size="large"
                        color="primary"
                        onClick={onClickExec}
                    >
                    {enabled?"無効化する":"有効化する"}
                    </Button>
                    <Button
                        variant="contained"
                        size="large"
                        color="secondary"
                        onClick={() => navigate('/dashboard') }
                    >
                    もどる
                    </Button>
                </CardActions>
            </Card>
        </Box>
    );
};
現状有効化しているか無効化しているかを知る方法が見つからなかったので、、QRコードが取得できるかどうかで判定することにしたがコレでいいかは微妙か?

ダッシュボードから2要素認証ボタン押下。
パスワード確認画面でパスワードを確認する。いったんパスワード確認してあればこの画面は省略される。
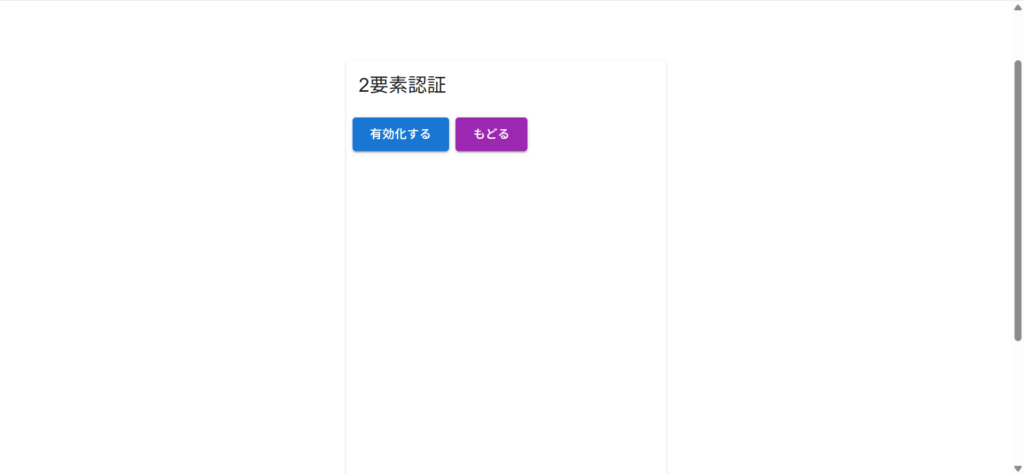
2要素認証画面から有効化するボタンを押下する。
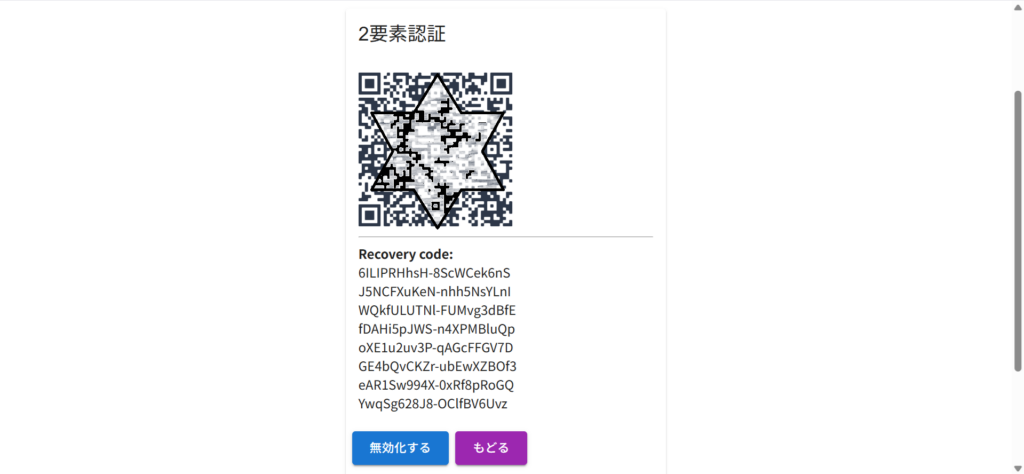
QRコードとリカバリーコードが表示される(一応このQRコードは情報もっていそうなので加工済み)。スマホのGoogle AuthenticatorでQRコード読み取り、リカバリーコードの保存を行ってから戻るボタン押下。
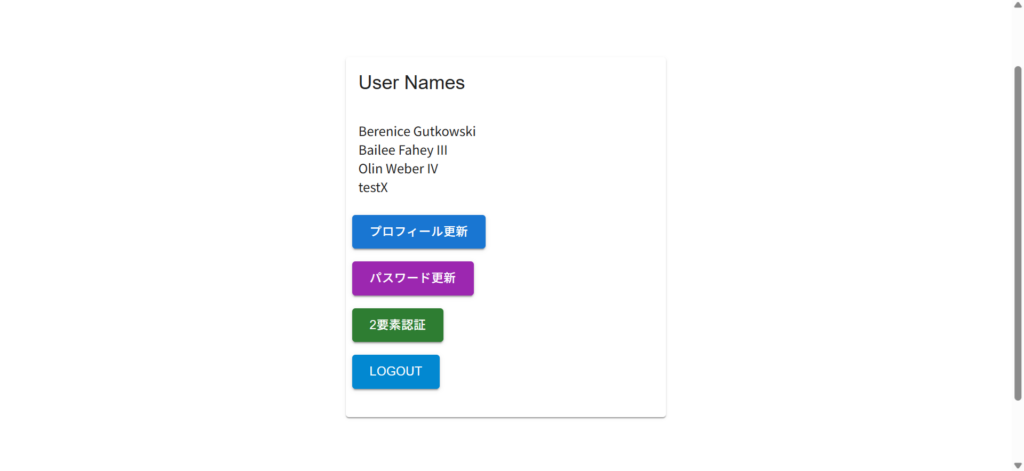
ダッシュボード画面でログアウトする。
次はログイン時処理。パクリ元10個目に、
認証プロセス中にFortifyはユーザーをアプリケーションの2要素認証チャレンジ画面に自動的にリダイレクトします。ただし、アプリケーションがXHRログイン要求を行っている場合、認証の試行が成功した後に返されるJSON応答には、
two_factor論理値プロパティを持つJSONオブジェクトが含まれます。この値を調べ、アプリケーションの2要素認証チャレンジ画面にリダイレクトする必要があるかどうかを確認する必要があります。
とあるので、ログイン成功後に分岐させ、チャレンジ用モジュール作成。
・・・
                http.post('/api/login', {email, password}).then((res2) => {
                    if (res2.status === 200) {
                        if (res2.data.two_factor) {
                            navigate("/two-factor-challenge")
                        } else {
                            console.log("ログインに成功しました。");
                            navigate("/dashboard");
                        }
                    } else {
                        console.log("ログインに失敗しました。");
                    }
                }).catch((err) => {
                    console.log(err.response.data.message)
                })
・・・
・・・
import { TwoFactorChallenge } from "./TwoFactorChallenge";
・・・
        <Route path="/two-factor-challenge" element={<TwoFactorChallenge />} />
・・・
import {
Box,
Button,
Card,
CardActions,
CardContent,
CardHeader,
TextField,
} from "@mui/material";
import { useState } from 'react';
import { useNavigate } from "react-router-dom";
import axios from 'axios';
const cardStyle = {
display: "block",
transitionDuration: "0.3s",
height: "450px",
width: "400px",
variant: "outlined",
};
const http = axios.create({
baseURL: 'http://localhost',
withCredentials: true,
});
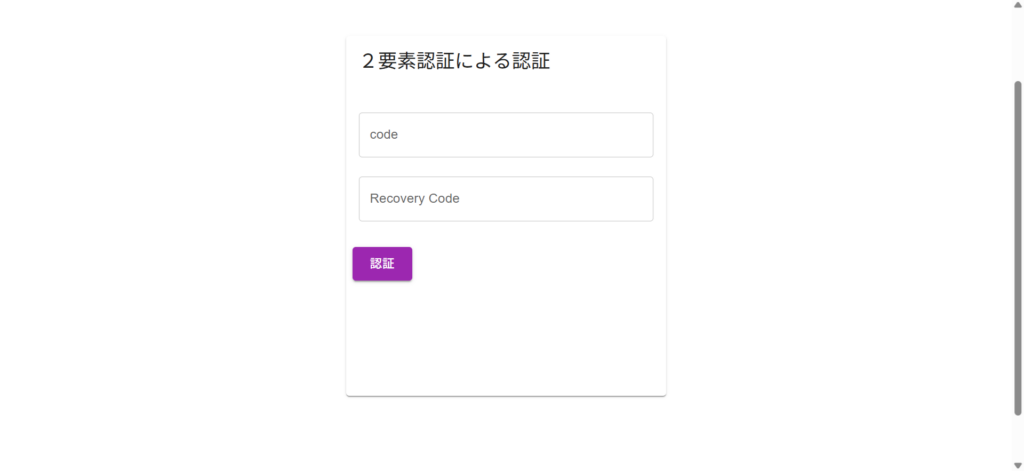
export const TwoFactorChallenge = () => {
const [code, setCode] = useState("");
const [recoveryCode, setRecoveryCode] = useState("");
const navigate = useNavigate();
const onClickTwoFactorChallenge = () => {
const exec = async () => {
http.get('/sanctum/csrf-cookie').then((res1) => {
const arg = code?{"code" : code}:{"recoveryCode" : recoveryCode};
http.post('/api/two-factor-challenge', arg).then((res2) => {
if (res2.status === 204) {
console.log("2要素認証成功")
navigate("/dashboard");
} else {
console.log("2要素認証に失敗しました。")
}
}).catch((err) => {
console.log(err.response.data.message)
})
}).catch((err) => {
console.log(err.response.data.message)
})
}
exec();
};
return (
<Box
display="flex"
alignItems="center"
justifyContent="center"
padding={20}
>
<Card style={cardStyle}>
<CardHeader title="2要素認証による認証" />
<CardContent>
<div>
<TextField
fullWidth
id="code"
type="text"
label="code"
placeholder="code"
margin="normal"
onChange={(e) => setCode(e.target.value)}
/>
<TextField
fullWidth
id="recovery_code"
type="text"
label="Recovery Code"
placeholder="Recovery Code"
margin="normal"
onChange={(e) => setRecoveryCode(e.target.value)}
/>
</div>
</CardContent>
<CardActions>
<Button
variant="contained"
size="large"
color="secondary"
onClick={onClickTwoFactorChallenge}
>
認証
</Button>
</CardActions>
</Card>
</Box>
);
};
試してみる。
ログインすると2要素認証画面へ遷移。
認証が通ればダッシュボード画面へ。

いやぁここまで長かったよ!?うまく動かない時は react ⇔ blade 何度も変更して確認して、、以下コマンドやらないとキャッシュのせいで全然動かなくなるし、、苦痛だったね、、
~/example-app$ sail artisan cache:clear
~/example-app$ sail artisan config:cache
~/example-app$ sail artisan route:cache
~/example-app$ sail artisan optimize
よくある、メール認証やSMS認証によるログインもやりたかったが、Fortify では存在しないよう。もう古いのかな。他にも Google2FA というモジュールを使用した例もあったが疲れ切ったのでもう良しとする。
追記:
メール認証できてなくてもログインできちゃうな、、これ。よくないなコレ。
メール認証チェックのソース Illuminate\Auth\Middleware\EnsureEmailIsVerified 見たら $request->user() 見てるからログイン後にやっとメール認証してるかどうかを確認できるんだけど、そうすると認証されていない場合はログアウトしてほしいわけ。一度ログインさせるとめんどくさいので、ログイン前に email_verified_at カラムなかったらそこでアウトにするしかない、ログインルート vendor/laravel/fortify/routes/routes.php をいじるわけにもいかないので、全く同じものをアプリ側のルートに記載してゴニョゴニョする、、こうするとメール認証されていない場合、先に弾けるわけだが、、他人のメール認証されてるかも分かっちゃうな、、やっぱりログインしてから認証チェックしてダメだったらログアウトさせるように修正。コントローラーいじるのとどっちが罪深いのか・・
<?php

use App\Http\Controllers\Api\UsersController;
use Illuminate\Http\Request;
use Illuminate\Support\Facades\Route;
use App\Models\User;

use Laravel\Fortify\Http\Controllers\AuthenticatedSessionController;
use Laravel\Fortify\RoutePath;
use Laravel\Fortify\Http\Requests\LoginRequest;
$limiter = config('fortify.limiters.login');
Route::post(RoutePath::for('login', '/login'), function (LoginRequest $request, AuthenticatedSessionController $controller) {
    $ret = $controller->store($request);
    if (isset($ret->original['two_factor'])) {
        // 認証OK
        $user = User::where('email', $request->email)->get()->first();
        if (isset($user->email_verified_at)) {
            return $ret;
        } else {
            $ret = $controller->destroy($request);
            abort(403, 'Your email address is not verified.');
        }
    } else {
        return $ret;
    }
})->middleware(array_filter([
        'guest:'.config('fortify.guard'),
        $limiter ? 'throttle:'.$limiter : null,
    ]))->name('login.store');

Route::middleware('auth:sanctum', 'verified')->group(function () {

    Route::get('/user', function (Request $request) {
        return $request->user();
    });

    Route::get('/users', [UsersController::class, 'index'])->name('api.users');

});
雑感
今回も長かった。すぐ終わると思ったのに長かった。
久々にペイントを開いたら Copilot が組み込まれてたので「Laravel Fortify 認証機能」のデジタルアートで作成したのがアイキャッチ画像。分かりやすくてサイコーだな、LARAVLEてのがまたイイ!クソが!